Call Us
0800 086 2927Email Us
Are you the sort of person who loves to have a unique looking home? You don't have to stop at your floor covering. 3D epoxy resin flooring or PU floors can create fashionable floors that will take the breath away from any visitors to your home and will make you smile every time you enter the room. Better yet, epoxy resin and PU resin are both high performance and durable so can last for over a decade as long as they are installed properly. When you order a 3D epoxy floor or PU floor from us, you can expect a professional contractor with years of experience installing resin floors who will give you a high-quality floor that will look exactly as you hoped.
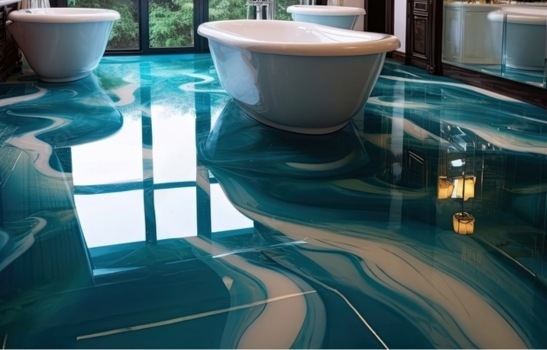
A 3D epoxy floor or PU floor is a unique way of using epoxy or PU resin to create a photorealistic floor that makes the image you choose look three-dimensional. The image is laid under a transparent resin coating and that increased depth makes the image stop looking two-dimensional. It's a clever visual effect that works to create truly striking floors.
One of the major benefits of a PU or epoxy coating is that it is highly durable. Resin is used as a floor coating in industrial and commercial settings because it is so hard-wearing and can take heavy loads. Using a floor coating like this in your home means that you will have a floor that can take just about anything that you can throw at it.
You can expect your resin floor to last a decade or more, depending on how much foot traffic there is going.
More details > Are resin floors durable?
Resin floors are scratch resistant and you can make them even more scratch-resistant again by adding a protective varnish. Because of this, you can use heavy furniture in the room without needing to worry about it scratching the floors.
More details > Do epoxy resin floors scratch?
Resin floors are resistant to heat which makes them perfect for kitchens. PU floors, in particular, are highly resistant to high temperatures.
If you are concerned about fire safety, epoxy resin is resistant to thermal shock and PU resin is flame resistant. So it will resist spreading any fires that happen in your home.
PU floors are naturally slip-resistant, which makes them great for a floor that is likely to get wet often, including kitchens and bathrooms.
Resin, and PU resin, in particular, are hygienic floor surfaces. PU floors can even be food-grade and are used in industrial kitchens, dairies, breweries, and other food preparation areas. They are naturally resistant to bacteria, are seamless, and can be heavily sanitised without doing them any damage.
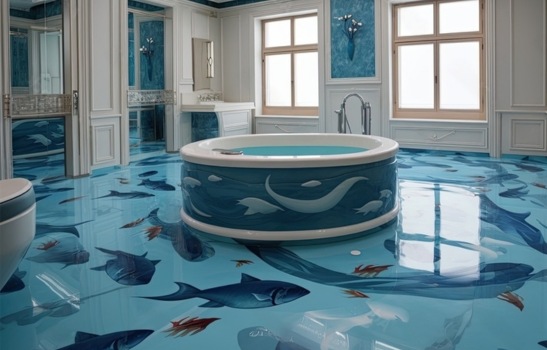
3D floors, in particular, create a unique and attractive floor. You can choose whatever image you like, from a complicated design to something more simple, so it is an opportunity to make your floor completely your own. The resin can be either gloss or matt and other design elements can be added in, such as metallic elements or colour pigments (although these aren't usually used for 3D floors because you need to be able to see the desired image).
You can even tie in the image on the 3D flooring with your walls to make the entire room truly pop.
3D epoxy flooring and PU flooring are easy to clean. You can use resin-specific cleaners or any other normal cleaning products to get rid of any dirt or grime, and removing dust is as simple as running a vacuum cleaner over the floor.
More details > How to clean resin floors
Installing 3D epoxy flooring or PU flooring is highly technical and difficult to achieve for someone trying to DIY it. The majority of the time, a professional contractor will be needed to install the floor as they will understand the technical requirements and will be able to install it to the correct specifications. Get in touch with us today if you want to talk through the installation options we can offer you.
Installing 3D epoxy flooring can be time-consuming. For the entire floor to be fully cured, you may have to wait 5 days or more. And in that time, you won't be able to use the room interior at all. 3D PU flooring takes less time and the room can fully cure and be ready to use over a weekend.
Because of how difficult they are to install and the materials used (including the image print), a 3D floor can be an expensive option. Although this can be balanced by the chance of having a unique floor design. A 3D floor with an epoxy coating will cost around £1 per square foot for the materials but 3D PU floors can be more expensive per square feet, costing between £5 and £10 per square foot.
On top of this price, you will need to include the labour costs associated with installing the floor and the cost of the printed image.
Once a PU or epoxy 3D floor is installed, it can be very difficult to remove. This is because it adheres so strongly to the concrete underneath. And there can be a high cost associated with the removal. Before installing the 3D flooring, you must make sure you are completely happy with the image and your resin choice.
When you choose a PU or epoxy 3D floor with us, we will make sure to work with you to find the option that will be perfect for the look you are hoping to achieve.
Resin can make for a cold floor. This is great in the summer but some people find it quite unusual in a living area to have a cold floor, rather than a warm one. And, of course, you would be reluctant to add a rug because that will cover the image in the 3D flooring.
Epoxy resin is not UV-resistant so it tends to yellow when it is in direct sunlight for a long period. You can apply a UV-resistant sealant to protect your 3D epoxy floor from sunlight if it is going to be near a large window or outside but this will need to be reapplied periodically.
PU resin 3D flooring, on the other hand, is naturally resistant to UV rays and damage.
Your 3D epoxy flooring or PU flooring should be installed by a professional. If you are interested in what the process looks like or you really want to give it a go yourself, let's take a look at how a 3D floor is installed.
The first step in installing 3D flooring is choosing your desired image. There are two options for this. You can buy a premade 3D floor sticker and these will be specially designed to work with 3D PU or epoxy flooring.
Your other option is to print your own images using a print shop that specialises in large designs. This has the benefit of you having complete control over your desired image but it is associated with a higher cost and you will need to ensure that your image is in a high resolution. Low-resolution images won't look good when printed to such a large size and will spoil the look of the 3D epoxy flooring.
When choosing an image, it is important to make sure that it has the correct perspective. Premade 3D floor stickers will be designed to have the right perspective but if you are choosing one of your own, you can make a mock-up on PhotoShop using the perspective distortion setting to see how it will look in the room space.
One of the most important steps of installing a PU or epoxy 3D floor, and one of the major factors behind why it can sometimes go wrong, is ensuring that the substrate condition is perfect for the floor.
3D epoxy flooring can be installed on multiple surfaces but all of them need to be prepared properly before installation can begin. The first thing that needs to be ensured is that the floor is completely flat. Any distortion in the substrate will likewise distort the 3D image and spoil the effect of the 3D epoxy flooring.
If there are any deep scratches or fractures in the floor, these will need to be filled in with putty to create a smooth surface. Lightly grinding the concrete surface can help to ensure that it is completely smooth.
The concrete will need to be tested for moisture. Any moisture can interfere with the PU or epoxy resin being able to adhere to the substrate and the 3D floor won't have the same durability that it normally would, and could lift or distort.
The final step in preparing the floor is to make sure it is completely clean. Any dust, dirt, mildew, etc that is on the floor will be trapped beneath the PU or epoxy top coat and could distort or degrade it. The floor should be vacuumed multiple times and then mopped with denatured alcohol.
Before the image can be laid, the floor needs to be primed. This is achieved using a self-levelling epoxy primer which needs to be left to dry completely before the image can be placed. The self-levelling primer can be applied using a plastic roller.
This is another crucial step in the process of creating 3D epoxy flooring where it can all go very wrong. There are two methods of sticking the image onto the surface. An epoxy resin adhesive can be used or a very strong high-quality glue.
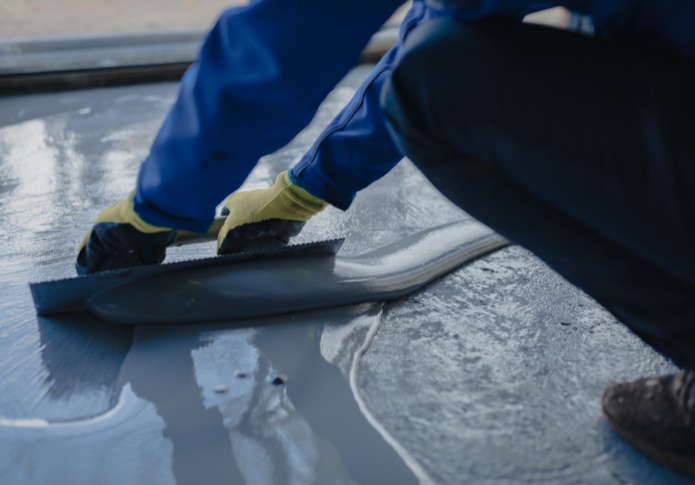
The adhesive should be applied to the entire floor using a toothed spatula. Being aware of the pot life of the adhesive is important because once it starts to harden, it will no longer adhere the image to the floor.
The image should be carefully laid onto the floor surface using a rubber pressure roller. To remove bubbling, a plastic squeegee should be used with even strokes from the centre to the outer edges, and this should be done multiple times.
The final stage in the process of creating a PU or epoxy 3D floor is to lay the transparent two-component epoxy or PU topcoat. The two components are a resin and a hardener and these need to be mixed to the exact ratio determined by the manufacturer. Too much hardener will make the floor porous and too much resin will mean that it may not adhere properly.
Once these are mixed thoroughly, they can be applied on top of the image. Again, taking note of the pot life is important because the task needs to be completed within the correct window. The coating can be applied using a plastic roller and should be applied evenly and gone over several times to prevent bubbling.
To create a 3D floor with the perfect image depth, you can choose the number of layers you want to add. One layer can be sufficient for some images, but for others, two layers can look better. A minimum depth of 1.5mm is normally required.
Installing a 3D floor using self-levelling epoxy coatings and a self-levelling primer can leave you exposed to chemicals, so it is important to take the right safety precautions. A respiratory mask should always be worn and windows should be kept open.


Maintaining a 3D epoxy floor or PU floor is easy, which is one of its major benefits. Any messes can be easily wiped or mopped away and the area can be vacuumed. You can also use a scratch-free pad and a lint-free cloth to make the area dust free and to give it a smooth look.
Your 3D epoxy floor will last you for years to come and won't need the sort of maintenance that other floors can require. And it will look amazing for that entire time.
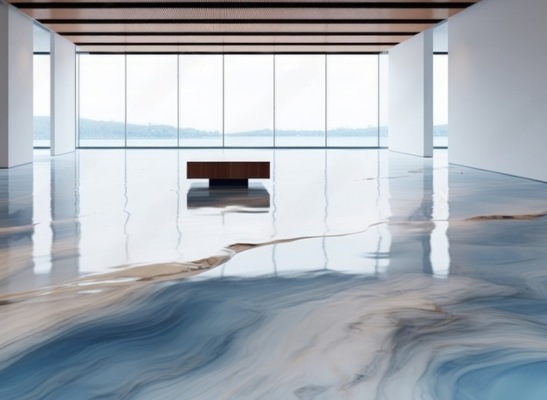
A 3D floor can visually increase the style of any space. You can see these types of striking floors often in shopping malls and other commercial environments but they can also look great in a home setting. A PU or epoxy 3D floor won't just look great but it will also last because of its durable and hardy nature. So it is a floor worth investing in. If you think a PU or epoxy 3D floor is the perfect option for you, we can help you to design the floor space you are imagining and we will install the 3D floor to a high professional standard that will last you for years to come.
3D resin flooring is known for its durability and can last for many years if properly maintained. Typically, you can expect your 3D resin floor to last anywhere between 15 to 20 years.
Yes, 3D resin flooring can often be applied over existing floors, including concrete and tiles. However, the underlying floor must be in good condition and properly prepared to ensure a successful application.
Indeed, the cost of 3D resin flooring can vary significantly depending on the complexity of the design. More intricate and customised designs often require additional time and materials, leading to higher costs.
Absolutely, 3D resin flooring is not only suitable for residential properties but also commercial settings. Its durability, aesthetic appeal, and customization make it an attractive choice for businesses such as retail stores, restaurants, and offices.